How MorphCast Emotion AI HTML5 SDK works
Getting Started
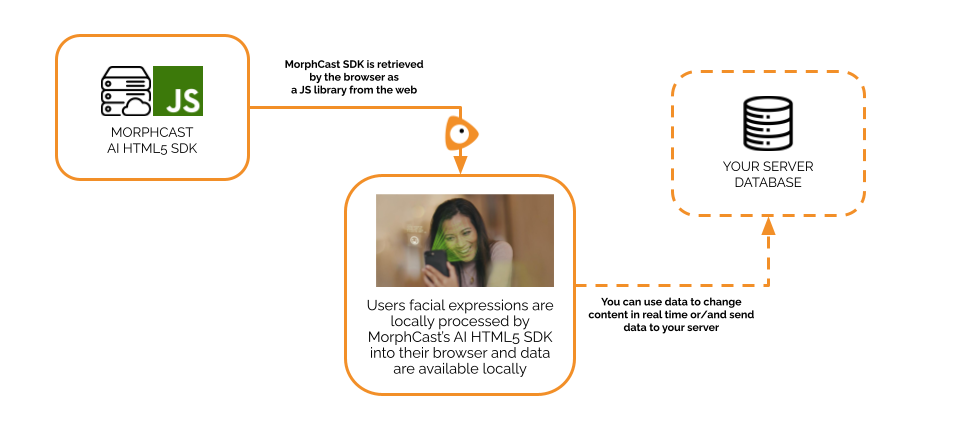
MorphCast Emotion AI HTML5 SDK is a native JavaScript engine, based on Deep Neural Networks.
It works directly in the web-browser of mobile and desktop and in a webview inside mobile App.
It fires events at an average rate of 10 times per second on mobile, and even up to 30 per second on desktop.
Data output is ready-to-use, already filtered for your convenience (parameters can also be changed in order to have a smoother or RAW output for more deep use in your code).
You can store all data produced in local memory, in local storage or properly send it to your server.
This SDK was developed with you in mind, to have a really quick integration into your application.
Integrations
The SDK can be easily integrated even in the most famous JavaScript frameworks, such as VueJS, AngularJS, ReactJS.
Below some available demo projects for each framework, with the SDK already integrated:
Example of code snippet
In general, the integration of the MorphCast Emotion AI HTML5 SDK library involves inserting two script tags into the body of an HTML page.
This is an example of a code snippet generated by the Quick Start Configurator above.
<body>
...
<script src="https://ai-sdk.morphcast.com/v1.17/ai-sdk.js"></script>
<script>
CY.loader()
  .addModule(CY.modules().FACE_DETECTOR.name)
  .load()
  .then(({ start, stop }) => start());

window.addEventListener(CY.modules().FACE_DETECTOR.eventName, (evt) => {
  console.log('Face detector result', evt.detail);
});
</script>
...
</body>
The first script tag references the MorphCast Emotion AI HTML5 SDK library hosted on the MorphCast server.
The second script tag contains code for setting the license key, adding the face detection module, and then starting the face detection process.
The code also registers an event listener for the face detection event, which will log the result to the console.
The same concept applies for all the other face analysis modules (emotions, arousal/valence, affects, etc.).
You shall serve the web page file using a web server, remote or local (e.g. http://localhost). Since camera access requires https, when using a private network ip (e.g. https://192.168.x.x) or a public domain, you shall enable SSL in your web server configuration. You will see the results of the analysis in the console log of your web browser.
Events
Below a list of output events emitted by the SDK.
EVENT_BARRIER
This event produces a single synchronized event for each frame acquired, collecting results from all modules. It contains output data of only added modules.
To register to this event, use:
window.addEventListener(CY.modules().EVENT_BARRIER.eventName, (event) => {
  console.log('Events barrier result', event.detail);
});
EVENT_BARRIER event.detail:
{
  camera: {frameTimestamp: Number},
  face_arousal_valence: {arousal, valence, affects38, affects98, quadrant},
  face_attention: {attention},
  face_detector: {totalFaces, rects, faces, status, fullFrameDetection},
  face_emotion: {dominantEmotion, emotion},
  face_quality: {isDark, darkness},
  face_features: {features},
  face_gender: {gender, mostConfident},
  face_pose: {pose},
  face_wish: {wish},
  ...
}
See the Modules section below, for additional details about output data of modules, how to add modules to the SDK and how to register only to some module-specific events.
CAMERA
This event is emitted each time a frame is correctly acquired from the source.
To register to this event, use:
window.addEventListener(CY.modules().CAMERA.eventName, (event) => {
  // ...
});
CAMERA event.detail:
- An ImageData object containing the frame acquired by the input source.
Example
const canvas = document.createElement('canvas');
document.body.appendChild(canvas);

window.addEventListener(CY.modules().CAMERA.eventName, (event) => {
  console.log('New frame in input');
  const ctx = canvas.getContext('2d');
  const imageData = event.detail;
  ctx.canvas.width = imageData.width;
  ctx.canvas.height = imageData.height;
  ctx.putImageData(imageData, 0, 0);
});
Modules
Below, a list of available modules. You can combine them as you like, e.g. to load FACE_DETECTOR and FACE_AGE:
loader = CY.loader()

      .addModule(CY.modules().FACE_DETECTOR.name, {})
      .addModule(CY.modules().FACE_AGE.name, {})
FACE_DETECTOR
FACE_DETECTOR initialization:
const config = {maxInputFrameSize: 320, smoothness: 0.83};
loader = CY.loader()

      .addModule(CY.modules().FACE_DETECTOR.name, config)
-
config:
- maxInputFrameSize: Number, default 320 (pixel). Reduces input dimensions to the maximum specified size, before performing face detection. Input dimensions should be greater or equal, up-scaling is not allowed. Normally, the value set should be between 160 and 640.
- smoothness: Number, default 0.83. Controls the filtering over time for the totalFaces output. Value should be in the range [0,1). A value near 1 provides greater smoothing and slower response (longer delay). Lower values provide lesser smoothing but faster response. Set it to 0 (zero) if you need the raw signal.
FACE_DETECTOR registration:
window.addEventListener(CY.modules().FACE_DETECTOR.eventName, (evt) => {
  console.log('Face detector result', evt.detail);
});
FACE_DETECTOR event.detail:
const FACE_DETECTOR_EVENT = {
    faces: Array(n),
    rects: Array(n),
    fullFrameDetection: Boolean,
    totalFaces: Number,
    totalFacesChangedFrom: Number | undefined
}
- faces: An array containing the detected faces in form of ImageData objects (zero or one; or multiple faces, if fullFrameDetection is true)
-
rects: An array of objects describing the bounding boxes (zero or one; or multiple rects, if fullFrameDetection is true)
- x: The upper left point x coordinate
- y: The upper left point y coordinate
- width: The width of the bounding box
- height: The height of the bounding box
- fullFrameDetection: A boolean. It is true when detection was full-frame and multiple faces can be returned, false otherwise.
- totalFaces: A number. It represents the total number filtered of faces detected, smoothened over an interval of time. Value is in the range [0,6]. This output is not synchronized with faces and rects arrays, do not use it to count their lengths! For single-frame or single-image analysis, set
smoothness: 0on the FACE_DETECTOR module to disable temporal filtering and get a per-frame value. - totalFacesChangedFrom: Optional, a number. When there is a significant change in the number of faces, it is defined and represents the previous number of faces. In case no change occurred, it is undefined. This output is not synchronized with faces and rects arrays.
Note: the faces and rects arrays contain all raw detections returned by the detector, including those with low confidence. totalFaces, on the other hand, only counts detections above an internal confidence threshold before applying temporal smoothing. If you need a reliable per-frame count from the raw arrays, filter by the confidence property of each rect (e.g. rects[i].confidence > 10). If you ever notice false positives, increasing this threshold can help.
Example
For detecting face presence, you can use the following snippet:
window.addEventListener(CY.modules().FACE_DETECTOR.eventName, (evt) => {
    if(evt.detail.totalFacesChangedFrom !== undefined) {
      console.log('Number of faces changed. Was: ' + evt.detail.totalFacesChangedFrom + ' . Now is: ' + evt.detail.totalFaces);
    }
  });
FACE_POSE
FACE_POSE initialization:
const config = {smoothness: 0.65};
loader = CY.loader()

      .addModule(CY.modules().FACE_POSE.name, config)
-
config:
- smoothness: Number, default 0.65. Value should be in the range [0,1). A value near 1 provides greater smoothing and slower response (longer delay). Lower values provide lesser smoothing but faster response. Set it to 0 (zero) if you need the raw signal.
FACE_POSE registration:
window.addEventListener(CY.modules().FACE_POSE.eventName, (evt) => {
  console.log('Face pose result', evt.detail);
});
FACE_POSE event.detail:
const FACE_POSE_EVENT = {
    output: {pose: {pitch: Number, roll: Number, yaw: Number}}
}
-
output: An object containing the output of the pose prediction
- pose: An object containing the filtered (smoothened) pose rotation angles expressed in radians as pitch, roll and yaw.
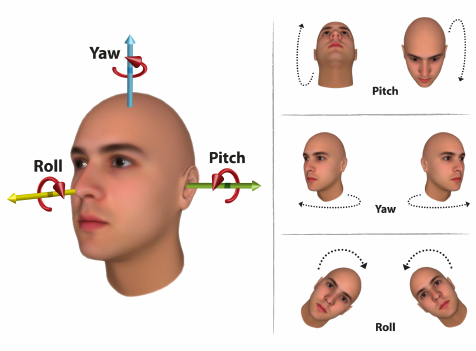
Notes:
- max and min ranges for rotation angles are currently limited to +- 0.47 radians, corresponding to +- (27°) in degrees, for each of the 3 axes
- the ZERO point is when a face looks straight at the camera
FACE_AGE
FACE_AGE initialization:
const config = {rawOutput: false};
loader = CY.loader()

      .addModule(CY.modules().FACE_AGE.name, config)
-
config:
- rawOutput: Boolean, default false. It disables all the filters and fires the event even if the prediction has a very poor quality. Set it to true only if you want the raw signal, for example to analyze a single photo.
FACE_AGE registration:
window.addEventListener(CY.modules().FACE_AGE.eventName, (evt) => {
  console.log('Age result', evt.detail);
});
FACE_AGE event.detail:
const FACE_AGE_EVENT = {
    output: {age: {_-18: Number, 18-35: Number, 35-51: Number, 51-_: Number}, numericAge : Number}
}
-
output: An object containing the output of the age prediction
-
age: An object containing the probabilities of the filtered (smoothened) age prediction:
- _-18: The probability that predicted age is less than 18 years old.
- 18-35: The probability that predicted age is greater than or equal to 18 years old and less than 35 years old.
- 35-51: The probability that predicted age is greater than or equal to 35 years old and less than 51 years old.
- 51-_: The probability that predicted age is greater than or equal to 51 years old.
- numericAge: A numeric estimate for the age
-
Note: in case of poor quality of the prediction, by default, the event is not fired (i.e. skipped for that frame).
FACE_EMOTION
FACE_EMOTION initialization:
const config = {smoothness: 0.40};
loader = CY.loader()

      .addModule(CY.modules().FACE_EMOTION.name, config)
-
config:
- smoothness: Number, default 0.40. Value should be in the range [0,1). A value near 1 provides greater smoothing and slower response (longer delay). Lower values provide lesser smoothing but faster response. Set it to 0 (zero) if you need the raw signal.
FACE_EMOTION registration:
window.addEventListener(CY.modules().FACE_EMOTION.eventName, (evt) => {
  console.log('Emotion result', evt.detail);
});
FACE_EMOTION event.detail:
const FACE_EMOTION_EVENT = {
    output: {
      dominantEmotion: String,
      emotion: {Angry: Number, Disgust: Number, Fear: Number, Happy: Number, Neutral: Number, Sad: Number, Surprise: Number}
    }
}
-
output: An object containing the output of the emotion prediction
- dominantEmotion: the name of the dominant emotion if present, otherwise it is undefined.
-
emotion: An object containing the filtered (smoothened) values of the probability distribution of emotions. The sum of all the probabilities is always 1, each probability in the distribution has a value between 0 and 1.:
- Angry: The probability for Angry.
- Disgust: The probability for Disgust.
- Fear: The probability for Fear.
- Happy: The probability for Happy.
- Sad: The probability for Sad.
- Surprise: The probability for Surprise.
- Neutral: The probability for Neutral.
Important note:
- FACE_EMOTION cannot be used simultaneously with FACE_EMOTION_HD. If both modules are added, only FACE_EMOTION_HD will be loaded, and a warning will be displayed in the console. For higher accuracy emotion recognition, consider using FACE_EMOTION_HD instead.
FACE_EMOTION_HD
This module is a high-resolution variant of the standard emotion recognition module, providing higher accuracy at the cost of increased computational load.
FACE_EMOTION_HD initialization:
const config = {smoothness: 0.40};
loader = CY.loader()

      .addModule(CY.modules().FACE_EMOTION_HD.name, config)
-
config:
- smoothness: Number, default 0.40. Value should be in the range [0,1). A value near 1 provides greater smoothing and slower response (longer delay). Lower values provide lesser smoothing but faster response. Set it to 0 (zero) if you need the raw signal.
FACE_EMOTION_HD registration:
window.addEventListener(CY.modules().FACE_EMOTION.eventName, (evt) => {
  console.log('Emotion HD result', evt.detail);
});
This module shares the same output event name as FACE_EMOTION, so you can use the same event listener for both modules.
FACE_EMOTION_HD event.detail:
const FACE_EMOTION_EVENT = {
    output: {
      dominantEmotion: String,
      emotion: {Angry: Number, Disgust: Number, Fear: Number, Happy: Number, Neutral: Number, Sad: Number, Surprise: Number}
    }
}
-
output: An object containing the output of the emotion prediction
- dominantEmotion: the name of the dominant emotion if present, otherwise it is undefined.
- emotion: An object containing the filtered (smoothened) values of the probability distribution of emotions. The labels are the same as the standard FACE_EMOTION module.
Important notes:
- FACE_EMOTION_HD and FACE_EMOTION cannot be used simultaneously. They are mutually exclusive for performance reasons.
- If both modules are added to the loader, only FACE_EMOTION_HD will be loaded, and FACE_EMOTION will be automatically removed with a warning message in the console.
- This module is more computationally intensive and may reduce the overall prediction frame rate when used together with other modules.
- When using this module, it is recommended to increase the global
maxInputFrameSizeparameter to at least 640 to preserve higher input resolution and avoid pre-downsampling that would limit the benefits of the HD model.
FACE_GENDER
FACE_GENDER initialization:
const config = {smoothness: 0.95, threshold: 0.70};
loader = CY.loader()

      .addModule(CY.modules().FACE_GENDER.name, config)
-
config:
- smoothness: Number, default 0.95. Value should be in the range [0,1). A value near 1 provides greater smoothing and slower response (longer delay). Lower values provide lesser smoothing but faster response. Set it to 0 (zero) if you need the raw signal.
- threshold: Number, default 0.70. Value should be in the range [0.5,1). It controls the minimum value of confidence for which gender and mostConfident output return a valid result instead of undefined.
FACE_GENDER registration:
window.addEventListener(CY.modules().FACE_GENDER.eventName, (evt) => {
  console.log('Gender result', evt.detail);
});
FACE_GENDER event.detail:
const FACE_GENDER_EVENT = {
    output: {
      gender: { Female: Number | undefined, Male: Number | undefined },
      mostConfident: String | undefined
    }
}
-
output: An object containing the output of the gender prediction
-
mostConfident: Gender name ("Male" or "Female") of the most likely result if its probability is above the threshold, otherwise it is undefined.
-
gender: An object containing the probability distribution of the gender prediction. The sum of the two values is always 1, each value in the distribution has a value between 0 and 1.:
- Female: The probability that predicted gender is Female. The value is undefined if the prediction has poor confidence.
- Male: The probability that predicted gender is Male. The value is undefined if the prediction has poor confidence.
-
FACE_FEATURES
FACE_FEATURES initialization:
const config = {smoothness: 0.90, showAll: false};
loader = CY.loader()

      .addModule(CY.modules().FACE_FEATURES.name, config)
-
config:
- smoothness: Number, default 0.90. Value should be in the range [0,1). A value near 1 provides greater smoothing and slower response (longer delay). Lower values provide lesser smoothing but faster response. Set it to 0 (zero) if you need the raw signal.
- showAll: Boolean, default false. When set to true, it returns all the available facial features. If set to false, it will filter out and return only a specific subset of facial features, removing features marked with an asterisk in the table below.
FACE_FEATURES registration:
window.addEventListener(CY.modules().FACE_FEATURES.eventName, (evt) => {
  console.log('Face features result', evt.detail);
});
FACE_FEATURES event.detail:
const FACE_FEATURES_EVENT = {
    output: {features: {"Arched Eyebrows": Number, "Attractive": Number, ...}}
}
-
output: An object containing the output of the face features prediction
-
features: An object containing the filtered (smoothened) probabilities of each face independent feature in the range [0.0, 1.0]:
Arched Eyebrows Attractive Bags Under Eyes (*) Bald Bangs (*) Beard 5 O'Clock Shadow Big Lips (*) Big Nose (*) Black Hair Blond Hair Brown Hair Chubby (*) Double Chin (*) Earrings Eyebrows Bushy Eyeglasses Goatee Gray Hair Hat Heavy Makeup (*) High Cheekbones Lipstick Mouth Slightly Open (*) Mustache Narrow Eyes Necklace Necktie No Beard (*) Oval Face Pale Skin Pointy Nose (*) Receding Hairline (*) Rosy Cheeks Sideburns Straight Hair Wavy Hair Features marked with an asterisk (*) will be removed when the
showAllconfiguration parameter is set tofalse.
-
FACE_AROUSAL_VALENCE
FACE_AROUSAL_VALENCE initialization:
const config = {smoothness: 0.70};
loader = CY.loader()

      .addModule(CY.modules().FACE_AROUSAL_VALENCE.name, config)
-
config:
- smoothness: Number, default 0.70. Value should be in the range [0,1). A value near 1 provides greater smoothing and slower response (longer delay). Lower values provide lesser smoothing but faster response. Set it to 0 (zero) if you need the raw signal.
FACE_AROUSAL_VALENCE registration:
window.addEventListener(CY.modules().FACE_AROUSAL_VALENCE.eventName, (evt) => {
  console.log('Face arousal valence result', evt.detail);
});
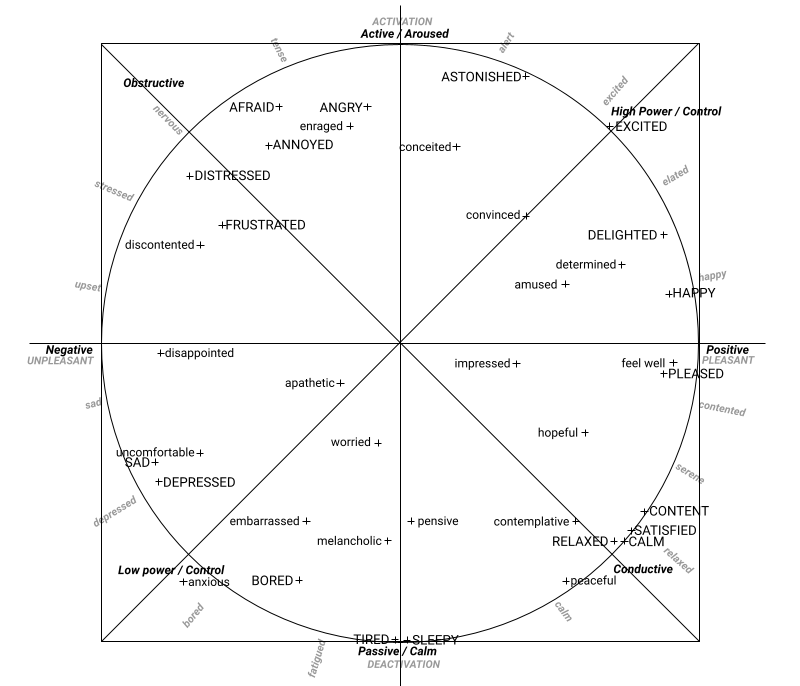
FACE_AROUSAL_VALENCE event.detail:
const FACE_AROUSAL_VALENCE_EVENT = {
    output: {
      arousal: Number,
      valence: Number,
      affects38 : { "Afraid": Number, "Amused": Number, .. },
      affects98 : { "Adventurous": Number, "Afraid": Number, .. },
      quadrant : String
  }
}
-
output: An object containing the output of the face arousal/valence prediction
-
arousal: value in the range [-1.0, 1.0]. It represents the smoothened degree of engagement (positive arousal), or disengagement (negative arousal).
-
valence: value in the range [-1.0, 1.0]. It represents the smoothened degree of pleasantness (positive valence), or unpleasantness (negative valence).
-
affects38: An object containing the smoothened probabilities of the 38 affects in the range [0.00, 1.00]:
Afraid Amused Angry Annoyed Uncomfortable Anxious Apathetic Astonished Bored Worried Calm Conceited Contemplative Content Convinced Delighted Depressed Determined Disappointed Discontented Distressed Embarrassed Enraged Excited Feel Well Frustrated Happy Hopeful Impressed Melancholic Peaceful Pensive Pleased Relaxed Sad Satisfied Sleepy Tired
-
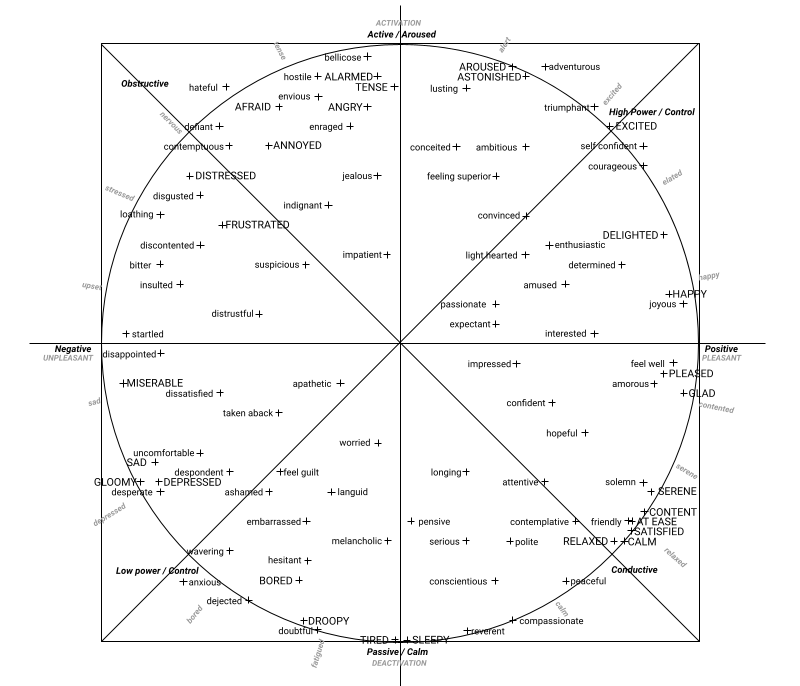
affects98: An object containing the smoothened probabilities of the 98 affects in the range [0.00, 1.00]:
Adventurous Afraid Alarmed Ambitious Amorous Amused Wavering Angry Annoyed Anxious Apathetic Aroused Ashamed Worried Astonished At Ease Attentive Bellicose Bitter Bored Calm Compassionate Conceited Confident Conscientious Contemplative Contemptuous Content Convinced Courageous Defient Dejected Delighted Depressed Desperate Despondent Determined Disappointed Discontented Disgusted Dissatisfied Distressed Distrustful Doubtful Droopy Embarrassed Enraged Enthusiastic Envious Excited Expectant Feel Guilt Feel Well Feeling Superior Friendly Frustrated Glad Gloomy Happy Hateful Hesitant Hopeful Hostile Impatient Impressed Indignant Insulted Interested Jealous Joyous Languid Light Hearted Loathing Longing Lusting Melancholic Miserable Passionate Peaceful Pensive Pleased Polite Relaxed Reverent Sad Satisfied Selfconfident Serene Serious Sleepy Solemn Startled Suspicious Taken Aback Tense Tired Triumphant Uncomfortable
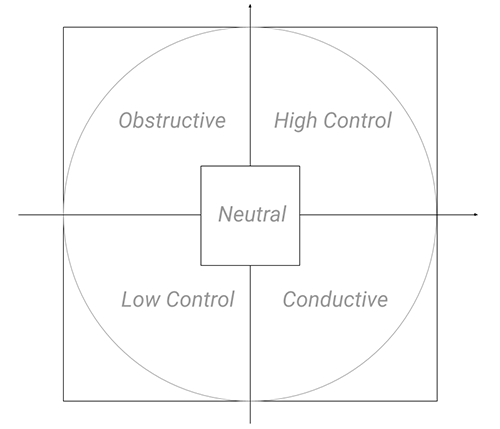
- quadrant: A string representing one of the four quadrants in the cirumplex model of affect ("High Control", "Obstructive", "Low Control", "Conductive", or "Neutral")
-
FACE_ATTENTION
FACE_ATTENTION initialization:
const config = {smoothness: 0.83};
loader = CY.loader()

      .addModule(CY.modules().FACE_ATTENTION.name, config)
-
config:
- smoothness: Number, default 0.83. Value should be in the range [0,1). A value near 1 provides greater smoothing and slower response (longer delay). Lower values provide lesser smoothing but faster response. Set it to 0 (zero) if you need the raw signal.
- riseSmoothness: Number. Same as smoothness, but is applied only when attention value is increasing. By default it has the same value as smoothness parameter.
- fallSmoothness: Number. Same as smoothness, but is applied only when attention value is decreasing. By default it has the same value as smoothness parameter.
Recommendation: depending on your use case, we suggest to accurately tune the riseSmoothness and fallSmoothness parameters, which control how quickly the attention value reacts to increases or decreases. The default configuration uses symmetric values, but we recommend testing an asymmetric setup with faster recovery when attention returns and slower decay when attention temporarily drops. This usually better matches real sessions, since very short glances away should not necessarily be treated as meaningful attention loss, while sustained drops should still be captured clearly.
For example, for an educational use case we suggest the following asymmetric configuration: { riseSmoothness: 0.15, fallSmoothness: 0.98 }. With these values, attention rises quickly (in the order of ~100ms) as soon as favorable attention signals are detected, while it decays slowly when those signals are absent, taking approximately 10–20 seconds to fall.
FACE_ATTENTION registration:
window.addEventListener(CY.modules().FACE_ATTENTION.eventName, (evt) => {
  console.log('Face attention result', evt.detail);
});
FACE_ATTENTION event.detail:
const FACE_ATTENTION_EVENT = {
    output: {attention: Number}
}
-
output: An object containing the output of the face attention prediction
- attention: filtered value (smoothened) in the range [0.0, 1.0]. A value close to 1.0 represents attention, a value close to 0.0 represents distraction.
Note: If no face is detected, the attention output will continue to be emitted for each provided frame, and will gradually decrease to zero. The rate of this decay is determined by the 'smoothness' or 'fallSmoothness' parameter set: a value of 0 (zero) results in an immediate drop to zero, while higher values allow for a more gradual decrease.
FACE_QUALITY
FACE_QUALITY initialization:
const config = {enable: true, skipDarkFrames: true, skipDarknessThreshold: 0.5};
loader = CY.loader()

      .addModule(CY.modules().FACE_QUALITY.name, config)
-
config:
- enable: Boolean, default true. Enable or disable quality check processing.
- skipDarkFrames: Boolean, default true. When enabled, frames that are too dark (insufficient lighting) will be skipped from processing.
- skipDarknessThreshold: Number, default 0.5. Threshold value in the range [0, 1] for the darkness score. Frames with darkness above this threshold will be skipped when skipDarkFrames is enabled.
- showWarnings: Boolean, default true. Show console warnings when frames are skipped due to quality issues.
FACE_QUALITY registration:
window.addEventListener(CY.modules().FACE_QUALITY.eventName, (evt) => {
  console.log('Face quality result', evt.detail);
});
FACE_QUALITY event.detail:
const FACE_QUALITY_EVENT = {
    output: {isDark: Boolean, darkness: Number}
}
-
output: An object containing the output of the face quality assessment
- isDark: Boolean value indicating whether the frame is too dark (based on the skipDarknessThreshold).
- darkness: Numeric score in the range [0, 1], where 0 represents a well-lit frame and 1 represents an extremely dark frame.
FACE_QUALITY is automatically included in the facial analysis pipeline and is enabled by default. It analyzes the quality of each face frame (e.g., lighting conditions) and can automatically skip low-quality frames before they reach downstream modules.
When skipDarkFrames is active and a frame is skipped, downstream analysis modules (such as FACE_AGE, FACE_EMOTION, FACE_GENDER, etc.) will not emit output events for that frame.
You only need to add this module explicitly with addModule if you want to change its configuration parameters or disable it.
Note: The module also tracks statistics and logs a summary to the console every 10 seconds when warnings are enabled, showing how many frames were skipped due to quality issues.
Tip — using darkness to improve illumination dynamically: it is also recommended to use the darkness output to detect cases of poor face lighting and, when the value is high, dynamically switch the application UI to a white background or display a bright white screen near the user. This strategy can significantly improve face illumination in low-light environments and has been shown to be highly effective in practice.
Note: FACE_QUALITY reports lighting conditions on the detected face crop, so this signal is only available when the face detector has already found a face. If the environment is so dark that the face detector cannot locate a face at all, FACE_QUALITY will not emit events for that frame. In this scenario, face_detector.totalFaces will gradually tend toward zero (it is smoothed over time by the smoothness parameter). For an immediate per-frame check, set smoothness: 0 on FACE_DETECTOR, or inspect rects.length after filtering for rects[i].confidence > threshold. See also What should I do if the face or frame is too dark?.
FACE_WISH
FACE_WISH initialization:
 const config = {smoothness: 0.8};
loader = CY.loader()

      .addModule(CY.modules().FACE_WISH.name, config)
-
config:
- smoothness: Number, default 0.80. Value should be in the range [0,1). A value near 1 provides greater smoothing and slower response (longer delay). Lower values provide lesser smoothing but faster response.
FACE_WISH registration:
window.addEventListener(CY.modules().FACE_WISH.eventName, (evt) => {
  console.log('Face wish result', evt.detail);
});
FACE_WISH event.detail:
const FACE_WISH_EVENT = {
    output: {wish: Number}
}
-
output: An object containing the output of the face wish prediction
- wish: filtered value (smoothened) in the range [0, 1.0]. A value close to 0 represents a lower wish, a value close to 1.0 represents a higher wish.
FACE_POSITIVITY
FACE_POSITIVITY initialization:
const config = {smoothness: 0.40, gain: 2, angle: 17};
loader = CY.loader()

      .addModule(CY.modules().FACE_POSITIVITY.name, config)
-
config:
- smoothness: Number, default 0.40. Value should be in the range [0,1). A value near 1 provides greater smoothing and slower response (longer delay). Lower values provide lesser smoothing but faster response.
- gain: Number, default 2. Factor of multiplication.
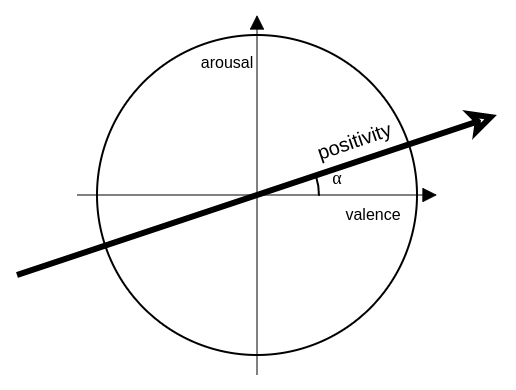
- angle: Number, default 17. Angle α (in the picture below) in degrees relative to the slope of the line, in the emotional spectrum, onto which the points are projected and the positivity metric is calculated.
FACE_POSITIVITY registration:
window.addEventListener(CY.modules().FACE_POSITIVITY.eventName, (evt) => {
  console.log('Face positivity result', evt.detail);
});
FACE_POSITIVITY event.detail:
const FACE_POSITIVITY_EVENT = {
    output: {positivity: Number}
}
-
output: An object containing the output of the face positivity prediction
- positivity: filtered value (smoothened) in the range [0, 1.0]. A value close to 0 represents a lower positivity, a value close to 1.0 represents a higher positivity.
Note: after the first face prediction, this module will continue to emit events even though there are no frames or faces to analyze.
ALARM_NO_FACE
ALARM_NO_FACE initialization:
const config = {timeWindowMs: 10000, initialToleranceMs: 7000, threshold: 0.75};
loader = CY.loader()

      .addModule(CY.modules().ALARM_NO_FACE.name, config)
-
config:
- timeWindowMs: Number, default 10000. Timespan in milliseconds of data to consider, in order to trigger the alarm.
- initialToleranceMs: Number, default 7000. Amount of initial time to ignore, to avoid triggering false-positive alarms.
- threshold: Number, default 0.75. Value should be in the range (0,1]. Percentile of data in the time window necessary to trigger the alarm.
ALARM_NO_FACE registration:
window.addEventListener(CY.modules().ALARM_NO_FACE.eventName, (evt) => {
  console.log('Alarm no face result', evt.detail);
});
ALARM_NO_FACE event.detail:
const ALARM_NO_FACE_EVENT = {
    output: {noFace: Boolean}
}
-
output:
- noFace: Boolean. It is true when the alarm is ON, false otherwise.
Important note: ALARM_NO_FACE is a temporal alarm, not a per-frame face-presence indicator. Its output reflects the no-face condition accumulated over the last timeWindowMs milliseconds: it can remain true even after a face has just reappeared in the stream, until the recent time window falls below the configured threshold. This behavior is intentional — it is designed for supervision use cases such as online exams or e-learning sessions, where the alarm should stay active until the expected condition has been stable for a sufficient period.
If you need to know whether a face is present in the current analyzed frame, use FACE_DETECTOR.totalFaces instead. Set smoothness: 0 on FACE_DETECTOR to disable temporal filtering and receive raw, per-frame results aligned with the frame currently being processed. Note: even with smoothness: 0, totalFaces only counts detections above an internal confidence threshold. For a fully raw count, inspect rects.length directly — but keep in mind that the rects array may include low-confidence detections, so filtering by rects[i].confidence may still be necessary.
ALARM_MORE_FACES
ALARM_MORE_FACES initialization:
const config = {timeWindowMs: 3000, initialToleranceMs: 7000, threshold: 0.33};
loader = CY.loader()

     .addModule(CY.modules().ALARM_MORE_FACES.name, config)
-
config:
- timeWindowMs: Number, default 3000. Timespan in milliseconds of data to consider, in order to trigger the alarm.
- initialToleranceMs: Number, default 7000. Amount of initial time to ignore, to avoid triggering false-positive alarms.
- threshold: Number, default 0.33. Value should be in the range (0,1]. Percentile of data in the time window necessary to trigger the alarm.
ALARM_MORE_FACES registration:
window.addEventListener(CY.modules().ALARM_MORE_FACES.eventName, (evt) => {
 console.log('Alarm more faces result', evt.detail);
});
ALARM_MORE_FACES event.detail:
const ALARM_MORE_FACES = {
   output: {moreFaces: Boolean}
}
-
output:
- moreFaces: Boolean. It is true when the alarm is ON, false otherwise.
Note: Like all ALARM modules, this is a temporal alarm based on a sliding time window. Its output can remain true for some time after the triggering condition has ended, until the recent history no longer satisfies the configured threshold.
ALARM_LOW_ATTENTION
ALARM_LOW_ATTENTION initialization:
const config = {timeWindowMs: 5000, initialToleranceMs: 7000, threshold: 0.33};
loader = CY.loader()

      .addModule(CY.modules().ALARM_LOW_ATTENTION.name, config)
-
config:
- timeWindowMs: Number, default 5000. Timespan in milliseconds of data to consider, in order to trigger the alarm.
- initialToleranceMs: Number, default 7000. Amount of initial time to ignore, to avoid triggering false-positive alarms.
- threshold: Number, default 0.33. Value should be in the range (0,1]. Percentile of data in the time window necessary to trigger the alarm.
ALARM_LOW_ATTENTION registration:
window.addEventListener(CY.modules().ALARM_LOW_ATTENTION.eventName, (evt) => {
  console.log('Alarm low attention result', evt.detail);
});
ALARM_LOW_ATTENTION event.detail:
const ALARM_LOW_ATTENTION = {
    output: {lowAttention: Boolean}
}
-
output:
- lowAttention: Boolean. It is true when the alarm is ON, false otherwise.
Note: Like all ALARM modules, this is a temporal alarm based on a sliding time window. Its output can remain true for some time after the triggering condition has ended, until the recent history no longer satisfies the configured threshold.
DATA_AGGREGATOR
This module collects data from the EVENT_BARRIER output, and cyclically aggregates data over time, according to the time period set.
Some types of aggregations are: MIN, MAX, AVG, LAST.
DATA_AGGREGATOR initialization:
const config = {initialWaitMs: 2000, periodMs: 1000};
loader = CY.loader()

      .addModule(CY.modules().DATA_AGGREGATOR.name, config)
-
config:
- initialWaitMs: Number, default 2000. Initial time to wait before starting the collection and aggregation of data.
- periodMs: Number, default 1000. Time period for data collection and aggregation.
DATA_AGGREGATOR registration:
window.addEventListener(CY.modules().DATA_AGGREGATOR.eventName, (evt) => {
  console.log('Data aggregator result', evt.detail);
});
DATA_AGGREGATOR event.detail:
{
	timestamp: {
		from: Number,
		to: Number,
		samples: Number
	},
	arousal: {
		min: Number,
		max: Number,
		avg: Number,
		last: Number,
		samples: Number
	},
	affects98_Adventurous: { .. },
	affects98_Afraid: { .. },
	...
}
Notes:
Output events of this module are not synced to the event barrier and do not appear in the event barrier.
Aggregation is performed:
- only for modules that were explicitly added in SDK initialization.
- only for time intervals in which frames were captured from the camera. No events are emitted when the SDK is stopped. In case the rate of analysis is running slower than the rate of aggregation, some events could be skipped.
Keys coming from the EVENT_BARRIER output have been remapped in order to be flat, in the following way:
- the module name is omitted (e.g. "face_arousal_valence.arousal" -> "arousal")
- multi-level nested output is mapped into a flat key, by using the underscore '_' as a separator (e.g. "face_arousal_valence.affects98.Adventurous" -> "affects98_Adventurous")
- in few cases, ambiguous names are further remapped (e.g. "face_gender.mostConfident" -> "gender_mostConfident").
For guidance on how DATA_AGGREGATOR windowing interacts with module-level smoothing, and how to avoid excessive double-smoothing, see How does module-level smoothing interact with DATA_AGGREGATOR?.
ADVANCED TOPICS
General
- Do I need a license key to use MorphCast Emotion AI HTML5 SDK?
- Can I run multiple instances of the SDK within the same web page?
- Can I dynamically change the configuration after the SDK load?
- Can I defer the download the SDK?
- How to stop the SDK?
- Does WebGL hardware acceleration improve accuracy or only performance?
- How can I monitor the prediction rate at runtime?
Camera stream
- How can I use a custom camera stream?
- How can I use a video stream intead of camera?
- How can I use an external IP camera as a custom source?
- How can I rotate the camera source?
- How can I crop the camera source?
- Can I get camera frames acquired by the library?
- Can I display the camera stream, with a higher resolution?
- How to analyze videos from Google Drive or similar?
- How should wide-angle cameras and camera image-correction features be handled?
Single picture
- How can I use a custom picture instead of a camera stream?
- Is it possible to analyze single pictures in an Android/iOS App?
Alert plugin (MPH Tools)
- How to configure the alert plugin?
- Can I check the browser compatibility without showing the default Alert?
- Can I show a custom privacy Alert when the user is prompted for camera access?
- Do I need to warn the user before opening his camera device?
SDK in App
- How can I integrate MorphCast SDK in an Android App?
- How can I integrate MorphCast SDK in an iOS App?
- How can I integrate MorphCast SDK in a Desktop App?
SDK in frameworks
Output values
- How can I represent the values in output of the SDK (using charts, histograms, etc.)?
- How can I use the values in output of the SDK?
- What confidence properties are exposed by the SDK?
- How does the smoothing algorithm work?
- How does module-level smoothing interact with DATA_AGGREGATOR?
- In which conditions can face analysis become less reliable?
- What are the recommendations for optimizing reliability?
- What should I do if the face or frame is too dark?
Video conferences
- Do I need a license key to use MorphCast Emotion AI HTML5 SDK?
Yes, it is necessary to have a license key to use MorphCast Emotion AI HTML5 SDK.
You can easily autonomously generate it by filling this form and you will receive it by email in 2 minutes.
- Can I run multiple instances of the SDK within the same web page?
No, you can load only one instance of the SDK. Multiple instances in parallel are currently not supported and could lead to an unpredictable behaviour.
- Can I dynamically change the configuration after the SDK load?
Currently, there are only few configuration parameters can be changed after the SDK load.
In particular, to change smoothness and threshold configuration in all modules where these parameters are present, it is sufficient to call the methods shown in the example below and pass the new values, after the loading of the SDK.
e.g.
CY.loader()

.addModule(CY.modules().FACE_GENDER.name, {smoothness: 0.95, threshold: 0.70})
.load().then(({ start, stop, getModule }) => {
start();
// ...
getModule(CY.modules().FACE_EMOTION.name).setSmoothness(0);
getModule(CY.modules().FACE_GENDER.name).setSmoothness(0);
getModule(CY.modules().FACE_GENDER.name).setThreshold(0.50);
// ...
});
- Can I defer the download the SDK?
Instead of downloading the SDK automatically using the HTML <script> Tag, you can postpone it by using the document.createElement("script") JavaScript method.
See an example of implementation here.
- How to stop the SDK?
You can always stop the analysis and resume it later, by respectively invoking the stop and start functions.
The getting-started snippet provides you the stop function as a parameter in the Promise returned by the load function. For example, you can stop the SDK 10 seconds after loading:
CY.loader()
  .addModule(CY.modules().FACE_DETECTOR.name)
  .load()
  .then(({ start, stop }) => {
       start();
       setTimeout(stop, 10000);
});
Or, you can assign the stop function to a global variable called stopMorphcast() and invoke it whenever and wherever you want :
var initMorphcast = new Promise ((res) => {
  res(CY.loader()
    .addModule(CY.modules().FACE_DETECTOR.name)
    .load());
});
var startMorphcast = () => initMorphcast.then(({start}) => start());
var stopMorphcast = () => initMorphcast.then(({stop}) => stop());
Note: if the processing of the current frame has already started, the SDK will process it and return the last result before actually being stopped.
- Does WebGL hardware acceleration improve accuracy or only performance?
WebGL hardware acceleration primarily improves SDK performance, prediction rate, and responsiveness. It does not directly make each individual frame-level measurement more accurate.
Compared to CPU-only execution, WebGL hardware acceleration can significantly increase the number of predictions processed per second, in some cases by 5x or more depending on the device, browser, GPU, active modules, and runtime conditions.
This higher prediction rate improves:
- temporal resolution;
- responsiveness;
- stability of short aggregation windows;
- ability to capture short-lived changes;
- robustness of downstream averages or decisioning logic.
The key distinction is that WebGL does not make a single prediction 5x more accurate. Instead, it allows the SDK to collect more usable observations over the same time interval.
When the SDK smoothing filter is enabled (always, by default), or when the application computes an average over the selected aggregation window, a higher number of valid samples in that same time interval can make the aggregated measurement more accurate and stable. This is because the final value is less dependent on isolated noisy frames and better represents the signal over the full window.
For example, if a product aggregates data every 1–2 seconds, a higher prediction rate means that each aggregation window can contain more valid samples. This usually makes the aggregated output more stable, less noisy, and more reliable for downstream decisioning.
For production use, the effective prediction rate should be monitored on the actual target devices and browsers.
As a practical guideline:
- more than 10 predictions per second is a good target for real-time use cases;
- below 7–8 predictions per second, short-window decisioning should be treated with more caution;
- below about 5 predictions per second, real-time decisioning becomes less reliable and should generally rely on more conservative aggregation, thresholds, or fallback logic.
The acceptable threshold depends on the use case. Session-level analytics can usually tolerate lower prediction rates than real-time triggers or short-lived event detection.
To monitor the actual prediction rate at runtime, and for guidance on tuning the powerSave parameter when running alongside resource-intensive browser applications, see How can I monitor the prediction rate at runtime?.
For a broader set of recommendations on achieving reliable results in production, see What are the recommendations for optimizing reliability?.
- How can I monitor the prediction rate at runtime?
The SDK dispatches the CY_LOG_TPS_NN event on window to report the current neural-network prediction rate. This event is emitted by the shared face-analysis backbone (FaceBase) used by the following modules: FACE_EMOTION, FACE_EMOTION_HD, FACE_AGE, FACE_GENDER, FACE_FEATURES, FACE_POSE, and FACE_AROUSAL_VALENCE.
To register to this event, use:
window.addEventListener('CY_LOG_TPS_NN', (evt) => {
  console.log('Prediction rate', evt.detail);
});
CY_LOG_TPS_NN event.detail:
{
  delta_t: Number,
  tps: Number,
  avg: Number
}
delta_t: time in milliseconds elapsed since the previous prediction.tps: instantaneous prediction rate for this interval, expressed in predictions per second (rounded to the nearest integer).avg: rolling average oftpsover a sliding window of approximately 17 samples, rounded to one decimal place. This is the most meaningful value for monitoring purposes.
Important caveats:
- This event is emitted only when a face is present and analysis is actually performed. If no face is detected, or if a frame is skipped due to quality checks (e.g.
FACE_QUALITYsignaling a dark frame), no event is emitted for that frame. Theavgvalue therefore reflects the rate of successful predictions, not the camera acquisition rate. - The event is emitted once per processed frame, not once per registered face-analysis module. All the modules listed above share the same backbone computation.
- During the initial warm-up phase after the SDK starts, or when very few frames have been processed,
avgmay not yet be representative. - The event is intended for monitoring and diagnostics. It should not be used as a control signal inside per-frame analysis logic.
Influencing the prediction rate:
The prediction rate depends on device performance, browser, active modules, and the powerSave parameter.
The powerSave factor controls how much idle time the SDK introduces between successive processing cycles. A higher value means more rest time after each frame analysis, which reduces CPU and GPU load but also reduces the prediction rate. The default value is 0.4.
A few important clarifications on how powerSave works:
- It is a throughput and scheduling control, not a CPU/GPU routing parameter. When WebGL hardware acceleration is available, the SDK uses it automatically.
powerSaveonly controls how aggressively the analysis loop is scheduled — it does not affect which compute backend is used. - It is a configuration-time parameter.
powerSaveis set at SDK initialization and should not be treated as a runtime control knob. Changing it requires reinitializing the SDK. In practice, the scheduling logic is already adaptive, so dynamic changes are rarely necessary. - Values above
1are supported but should be treated as advanced throttling settings and validated carefully against effective prediction rate and application responsiveness.
CY.loader()
  .powerSave(0)   // maximize prediction rate (no forced idle time)
  .addModule(CY.modules().FACE_EMOTION.name)
  .load().then(({ start }) => start());
CY.loader()
  .powerSave(1)   // reduce CPU/GPU usage (more idle time between frames)
  .addModule(CY.modules().FACE_EMOTION.name)
  .load().then(({ start }) => start());
Tuning guidance for resource-intensive environments:
When the SDK runs alongside a heavier browser application, the recommended approach is to start from the default value (0.4) and validate the effective prediction rate in the real application context. If resource pressure is noticeable, increase powerSave gradually while monitoring both the SDK prediction rate and overall application responsiveness. As a practical reference:
powerSave = 1is a reasonable starting point for concurrent high-resolution video playback;- values around
4may be appropriate for more demanding concurrent scenarios such as video conferencing.
The right value depends on the target device class and concurrent workload, so the configuration should always be validated on the actual application and devices.
Since GPU capabilities and hardware class are difficult to determine reliably from the browser environment, the effective prediction rate reported by CY_LOG_TPS_NN is the most practical runtime metric for evaluating whether a device can sustain a suitable analysis rate for the intended use case.
Event subscription overhead:
Subscribing to CY_LOG_TPS_NN introduces no measurable overhead, as long as the attached event handler remains lightweight.
For practical guidance on target prediction rates and their impact on decisioning, see Does WebGL hardware acceleration improve accuracy or only performance?.
- How can I use a custom camera stream?
The following utility snippet explains how to create a custom source.
You don’t need to open a camera stream, the SDK does it. In case you need to use a custom stream, follow the instructions. Remember that start-stop is already managed by the SDK.
<script>
   const myCamera; // Your actual camera object;

   const customSource = {
      // The getFrame methods must return a promise resolved with the ImageData of the currentFrame.
      // maxSize = Max size in px of the larger side of the frame. You should scale the image yourself before resolving it (optional).
      getFrame(maxSize) {
        return new Promise((resolve) => {
          resolve(myCamera.getFrame().toImageData());
        });
      },
      // resume the camera stream (can be an empty function)
      start() {

      },
      // stop the camera stream (can be an empty function)
      stop() {

      },
      // return the status of the camera Stream.
      get stopped() {

      }
  };

  CY.loader()
    .licenseKey("insert-here-your-license-key")
    .source(customSource)
    .addModule(CY.modules().FACE_DETECTOR.name)
    .load().then(({ start }) => {
    start();
  });
</script>
To create a custom stream using the Camera stream, you can use this ready-to-use function.
- How can I use a video stream intead of camera?
Here, there are a couple of ready-to-use functions you can use to create a custom source object using a video as an input.
By specifiying an intermediary HTMLVideoElement object, frames are grabbed from there and you have the full playback control:
const customSource = CY.createSource.fromVideoElement(document.getElementById("videoId"));

CY.loader()

  .source(customSource)
  // etc...
Otherwise, by providing a video URL, frames are grabbed from a video element automatically created and internally managed by the SDK:
const customSource = CY.createSource.fromVideoUrl("https://localhost/test.mp4");

CY.loader()

  .source(customSource)
  // etc...
- How can I use a custom picture instead of a camera stream?
As exposed in the following snippet, you need to pass each picture as an ImageData object, by calling:
customSource.analyzeFrame(...);
Note: for a synchronous analysis, you have to wait for the event result from the SDK before passing the next picture.
You can see a complete implementation using URLs to images, here.
<script>
  let crtImgData;
  let resolver;

  const customSource = {
      /*
        frame producer
      */
      analyzeFrame(imageData) {
        if (resolver) {
          resolver(imageData);
          resolver = null;
        } else {
          crtImgData = imageData;
        }
      },
      /*
        frame consumer
      */
      getFrame(...args) {
        if (crtImgData) {
          const p = Promise.resolve(crtImgData);
          crtImgData = null;
          return p;
        } else {
          return new Promise(res => resolver = res);
        }
      },
      start() { },
      stop() { },
      get stopped() { }
    };

    CY.loader()
      .licenseKey("insert-here-your-license-key")
      .source(customSource)
      .maxInputFrameSize(640) // allows higher resolutions of the frames in input
      .powerSave(0) // disable dynamic adjustment of the analysis rate
      .addModule(CY.modules().FACE_DETECTOR.name, {maxInputFrameSize: 640, smoothness: 0}) // disables filtering over time to enable one-shot analysis
                                                                   // and improves resolution of face detector
      .addModule(CY.modules().FACE_EMOTION.name, {smoothness: 0})
      .load().then(({start, stop}) => {
        start();
      }).catch((err) => {
        console.error(err);
      });

    /* This event is called after each face emotion analysis */
    window.addEventListener(CY.modules().FACE_EMOTION.eventName, (evt) => {
      // Remember to set smoothness to zero, in order to get the raw output for one-shot photo analysis.
      console.log(CY.modules().FACE_EMOTION.eventName, evt.detail.output.emotion);

      customSource.analyzeFrame(/* here, your next ImageData you want to process */);
    });

    customSource.analyzeFrame(/* here, the FIRST ImageData you want to process */);

  </script>
- How can I use an external IP camera as a custom source?
No browser natively supports RTSP streaming, that is, you cannot simply put a video tag on an HTML5 page and play the RTSP streaming.
Instead, the usual approach is to use a proxy or a streaming server to convert the RTSP stream into something readable by the browser, eg. HLS or DASH.
- How can I rotate the camera source?
The following utility snippet explains how to create a custom source to rotate camera.
You can see an example here.
<script>
  function initRotation({ width, height }) {
    const rotationCanvas = document.createElement('canvas');
    let rotationCtx = rotationCanvas.getContext('2d');
    rotationCanvas.width = height;
    rotationCanvas.height = width;
    rotationCtx.rotate(Math.PI / 2);
    rotationCtx.translate(0, -height);

    return rotationCtx;
  }

  const tmpCanvas = document.createElement('canvas');
  const tmpCtx = tmpCanvas.getContext('2d');

  function toCanvas(imageData) {
    tmpCanvas.width = imageData.width;
    tmpCanvas.height = imageData.height;
    tmpCtx.putImageData(imageData, 0, 0);
    return tmpCanvas;
  }

  let rotationCtx;
  let firstTime = true;
  const camera = CY.createSource.fromCamera();
  const customSource = {
    getFrame(...args) {
      const frameP = camera.getFrame(...args);
      return frameP.then((imageData) => {
        if (firstTime) {
          rotationCtx = initRotation(imageData);
          firstTime = false;
        }
        rotationCtx.drawImage(toCanvas(imageData), 0, 0);
        return rotationCtx.getImageData(0, 0, imageData.height, imageData.width);
      });
    },
    start() {
      return camera.start();
    },
    stop() {
      return camera.stop();
    },
    get stopped() {
      return camera.stopped;
    }
  };

  CY.loader()
    .licenseKey("insert-here-your-license-key")
    .source(customSource)
    .addModule(CY.modules().FACE_DETECTOR.name)
    .load().then(({ start }) => {
    start();
  });
</script>
- How can I crop the camera source?
The following utility snippet explains how to create a custom source to crop frames, e.g. to focus the detector on a specific area.
You can see an example here.
// Define here your crop region !
Crop = {
  x:0,
  y:0,
  w:100,
  h:100
};
// Define here your crop region !

const cropCanv = document.createElement('canvas');
const cropCanvCtx = newCan.getContext('2d');
const tmpCanvas = document.createElement('canvas');
const tmpCtx = tmpCanvas.getContext('2d');

function crop(ctx, x, y, w, h) {
  const imageData = ctx.getImageData(x, y, w, h);
  cropCanv.width = w - x;
  cropCanv.height = h - y;
  cropCanvCtx.putImageData(imageData, 0, 0);
  return cropCanvCtx.getImageData(0,0,cropCanv.width,cropCanv.height);
}

function toCanvasCtx(imageData) {
  tmpCanvas.width = imageData.width;
  tmpCanvas.height = imageData.height;
  tmpCtx.putImageData(imageData, 0, 0);
  return tmpCtx;
}

const camera = CY.createSource.fromCamera();
const customSource = {
  getFrame(...args) {
    const frameP = camera.getFrame(...args);
    return frameP.then((imageData) => crop(toCanvasCtx(imageData), Crop.x, Crop.y, Crop.w, Crop.h));
  },
  start() {
    return camera.start();
  },
  stop() {
    return camera.stop();
  },
  get stopped() {
    return camera.stopped;
  }
};

CY.loader()
  .licenseKey("insert-here-your-license-key")
  .source(customSource)
  .load().then(({ start }) => {
  start();
});
- Can I get camera frames acquired by the library?
You can use an event listener and attach the CAMERA event to a canvas:
const ctx = document.getElementById('canvas').getContext('2d');

window.addEventListener(CY.modules().CAMERA.eventName, (evt) => {
  const imageData = evt.detail;
  ctx.canvas.width = imageData.width;
  ctx.canvas.height = imageData.height;
  ctx.putImageData(imageData, 0, 0);
});
Note: camera stream has been sampled and frames resized
- Can I display the camera stream, with a higher resolution?
You can attach directly to the camera stream, before frames are sampled and resized by the library:
const video = document.createElement('video');
video.setAttribute('muted', '');
video.setAttribute('playsinline', '');
// fix for ios 11
video.style.position = 'absolute';
video.style.width = '0';
video.style.height = '0';
document.body.appendChild(video);
const constraints = {audio:false,video: { width: 1920, height: 1080 };

loader = CY.loader()

           .source(CY.createSource.fromCamera({constraints, video}))
...
Note: the SDK will internally down-scale the input, eg. to 320px.
If you want also the SDK to process a greater input, you have to set the maxInputFrameSize parameter to a greater value in two places, that is both in the configuration of the SDK and in the configuration of the FACE_DETECTOR module:
E.g.
...
loader = CY.loader().

         .source(CY.createSource.fromCamera({constraints, video}))
         .maxInputFrameSize(1920)
         .addModule(CY.modules().FACE_DETECTOR.name, {maxInputFrameSize: 1920})
...
Instead, if you want to manually sample camera frames at the same frequency of the library, you have to use a custom camera source and grab two frames at distinct resolutions (respectively, one for the library and one in HD for displaying):
const camera = CY.createSource.fromCamera();
  const customSource = {
    getFrame(...args) {
      camera.getFrame(/* full HD constraints */).then((imageData)=>{
        // put imageData into a full HD canvas
      }); // frame full HD

      return camera.getFrame(...args); // frame for the library
    },
    start() {
      return camera.start();
    },
    stop() {
      return camera.stop();
    },
    get stopped() {
      return camera.stopped;
    }
  };

  CY.loader()
    .licenseKey("insert-here-your-license-key")
    .source(customSource)
    .load().then(({ start }) => {
    start();
  }).catch((err) => {
    console.error(err);
  });
- How to analyze videos from Google Drive or similar?
If you need to analyze the videos from Google Drive, you have to use a proxy or download the files locally.
Usually, it is sufficient to add a crossOrigin="anonymous" attribute in the video element of your page, before the video is loaded:
<video crossorigin="anonymous" id="videoId" width="320" height="240" controls>
      <source src="{source}" type="video/mp4" />
</video>
However crossOrigin='anonymous' is only half the solution in order to pass cross-domain security requirements.
The other half of the solution is for the server to be configured to send the proper cross-origin permissions in its response headers. Without the server being configured to allow cross-origin access, the canvas would result tainted and an error would be thrown.
To enable CORS on the video source URLs as well, the video URL needs to return the following response header: Access-Control-Allow-Origin: * (or the domain to whitelist) But, since Google Drive response header is not under your control, you have to serve the video file using a cors-proxy or any other server having CORS allowed.
To set up a simple file server in localhost with CORS allowed, you can use the following npm tool:
http-server ./video_folder -c-1 --cors='*'
- How should wide-angle cameras and camera image-correction features be handled?
The SDK does not analyze the entire scene directly for affective inference. The usual processing flow is:
- acquire the camera frame;
- resize the input according to
maxInputFrameSize; - detect the face;
- extract the detected face crop;
- run the face-analysis modules on the face crop.
The maxInputFrameSize parameter controls the maximum input size used before face detection. A higher value, such as 640, can preserve more input detail before the face is detected, while still keeping processing efficient.
Wide-angle input is therefore mitigated by the face-detection and face-crop pipeline, because downstream face-analysis modules operate on the detected face region rather than on the full wide-angle scene.
However, this should not be interpreted as optical lens-distortion correction. If the face is close to the edge of a wide-angle frame, very small, strongly distorted, or affected by automatic camera processing, the quality of the crop and downstream measurements can still be affected.
Camera or OS-level processing may also influence results, including:
- gaze correction;
- automatic reframing / Center Stage-like behavior;
- perspective correction;
- beautification or appearance filters;
- virtual backgrounds;
- aggressive exposure or white-balance correction.
Recommended best practices:
- keep the face centered in the frame;
- keep the face reasonably large and within the expected distance range;
- avoid strong backlight, low light, and strong shadows;
- disable gaze correction, beautification, virtual backgrounds, and automatic reframing where possible;
- monitor face presence, face size, pose, face quality, and prediction rate;
- validate the SDK on the actual device, browser, OS, and camera settings used in production.
In general, wide-angle cameras and modern laptop cameras are not unsuitable by themselves. Before using the SDK in production, we recommend testing the same device, browser, OS, camera, and camera-effect combinations that your users are expected to use.
- Do I need to warn the user before opening his camera device?
Actually, it is not necessary to ask the user for consent, because the frames are processed locally on the browser and no personal data is sent to any server. But we highly recommend to explain to the user why the camera request is triggered and how the MorphCast SDK technology protects privacy.
You can use the alert plugin described below to automatically do this for you.
- How to configure the alert plugin?
Alert plugin (Mphtools) allows you to automatically check for browser compatibility and show a privacy Alert when the user is prompted for camera access. You can choose which settings to enable, by adding them in the mphtools-feature meta tag:
<head>
  <meta name="mphtools-feature" content="allowCompatibilityClose, compatibilityUI, cameraPrivacyPopup, compatibilityAutoCheck">
</head>
This is the list of settings:
- allowCompatibilityClose: shows the close button in the compatibility Alert
- compatibilityUI: checks if the browser is compatible with MorphCast SDK and shows a graphic Alert in case the browser is incompatible.
- cameraPrivacyPopup: shows a privacy Alert every time the user is prompted to grant the permission to camera access
- compatibilityAutoCheck: checks immediately the browser compatibility when the page is loaded, instead of waiting the camera request
- Can I check the browser compatibility without showing the default Alert?
Yes. If you are using the Alert plugin (mphtools), you can disable the automatic check for browser compatibility and the automatic visualization of the full-screen message. You need just to remove the compatibilityUI setting in the mphtools-feature meta tag:
<head>
  ...
  <meta name="mphtools-feature" content=""> // instead of content="compatibilityUI"
</head>
Then, you can check by yourself the browser compatibility:
switch(MphTools.Compatibility.check()){
    ...
    MphTools.Compatibility.status.SF_IOS:
        break;
    MphTools.Compatibility.status.COMPATIBILE:
        break;
    MphTools.Compatibility.status.INCOMPATIBLE:
        break;
    ...
}
The returned status can be:
- SF_IOS: 'not_sf_ios' - Case in iOS but different browser than Safari or Chrome
- INCOMPATIBLE: 'incompatbile' - Case with general Incompatibility
- COMPATIBLE: 'compatible' - this is the only status which grants compatibility
- Can I show a custom privacy Alert when the user is prompted for camera access?
Yes. Instead of the default privacy Alert, you can write your custom privacy message and use the integration instructions below.
Using the alert plugin (mphtools), add the cameraPrivacyPopup setting in the mphtools-feature meta tag. Then, provide an implementation to the callback methods in the customPrivacyAlert object to show or hide your custom alert, and apply the mphtools config before loading the SDK:
<head>
...
   <meta name="mphtools-feature" content="compatibilityUI, cameraPrivacyPopup, compatibilityAutoCheck">
</head>
<body>
...
<script src="https://sdk.morphcast.com/mphtools/v1.0/mphtools.js"></script>
<script src="https://ai-sdk.morphcast.com/v1.17/ai-sdk.js"></script>
<script>
const customPrivacyAlert = {
  show() {
    // write here the code for showing your custom Alert, when asking the camera to the user
  },
  hide() {
    // for hiding your custom Alert
  },
  cameraDenied(){
    // for showing an alternative message after camera has been denied by the user
  }
};
MphTools.config({customPrivacyAlert:customPrivacyAlert});

CY.loader()
  .licenseKey("insert-here-your-license-key")
  .addModule(CY.modules().FACE_DETECTOR.name)
  .load()
  .then(({ start, stop }) => start());

window.addEventListener(CY.modules().FACE_DETECTOR.eventName, (evt) => {
  console.log('Face detector result', evt.detail);
});
</script>
...
</body>
- How can I integrate MorphCast SDK in an Android App?
The following steps are shown in these templates. A working App example can be found here
- Create an Activity with a WebView inside.
- Configure the WebView to enable Javascript and to add a JavascriptInterface.
- Set the WebView URL to this page: webview URL (to import later on your server or inside the assets of the app)
- Declare the JavascriptInterface in order to have the functions getFrameFromApp(int maxSize) and onDataFromMphSdk(String type, String value).
In this way you will have a working bidirectional communication channel between the Javascript in the webview and the Android application.
- The Javascript in the html page will ask for a frame encoded in Base64 to be returned invoking the getFrameFromApp(int maxSize) method of the JavascriptInterface.
- The results of the Mph-SDK will be passed to the app through the method onDataFromMphSdk(String type, String value) of the JavascriptInterface.
- How can I integrate MorphCast SDK in an iOS App?
The following steps are shown in these templates. A working App example can be found here
- Create an app UIViewController with a WKWebView inside.
- Set the WebView URL to this page: webview URL (to import later on your server or inside the assets of the app)
- Instantiates and configure a WKUserContentController with two MessageHandlers: camera and data.
- Extend the ViewController with a WKScriptMessageHandler which contains the function used as a callback for the MessageHandlers.
In this way you will have a working bidirectional communication channel between the Javascript in the webview and the iOS application.
- The Javascript in the html page will ask through the MessageHandler (with WKScriptMessage.name == "camera") to return a frame encoded in Base64.
- The app should send the frame to the Javascript with the webview method webView.evaluateJavaScript("resolveFrame('([base64Image])')", completionHandler: nil) where [base64Image] is the string Base64 encoded of the frame. The results of the Mph-SDK will be passed to the app through the MessageHandler (with WKScriptMessage.name == "data")
- Is it possible to analyze single pictures in an Android/iOS App?
Yes, you can use the same instructions above.
We only suggest to update the html page where your App's webview target to, as follows.
As you are planning to analyze images not belonging to a video or camera stream, you need to disable all smoothing filters over time in all the modules. For example, to load the module FACE_DETECTOR use the following config:
const config = {smoothness: 0};
loader = CY.loader()

      .addModule(CY.modules().FACE_DETECTOR.name, config)
You can see an example here:
- How can I integrate MorphCast SDK in a Desktop App?
If your App is written in a native language (such as C, C++, Go, Java, or Python), you can use the Chromium Embedded Framework (CEF), or CefSharp in case of C# or VB.NET App.
If you are using Electron to build a cross-platform Desktop App, you can integrate the SDK following the example in our GitHub repository, here.
- How can I integrate MorphCast SDK in Typescript frameworks (e.g. Angular, etc.)?
In TypeScript, remember to use "globalThis.CY" instead of using "CY".
The simplest integration is to add the script tag for downloading the MorphCast SDK in the index.html page of your Angular project.
<html>
    <head>
        <title>Angular QuickStart</title>
        <script src="https://ai-sdk.morphcast.com/v1.17/ai-sdk.js"></script>
    </head>
    <body>
        <my-app>Loading...</my-app>
    </body>
</html>
Then, in your entry point file (e.g. "main.ts"), add the getting-started snippet below in order to load the MorphCast SDK.
globalThis.CY.loader()
  .licenseKey("insert-here-your-license-key")
  .addModule(globalThis.CY.modules().FACE_DETECTOR.name)
  .load()
  .then(({ start, stop }) => start());

window.addEventListener(globalThis.CY.modules().FACE_DETECTOR.eventName, (evt) => {
  console.log('Face detector result', evt.detail);
});
- How can I represent the values in output of the SDK (using charts, histograms, etc.)?
There are some ready-to-use graphical demo examples in our GitHub repository, here.
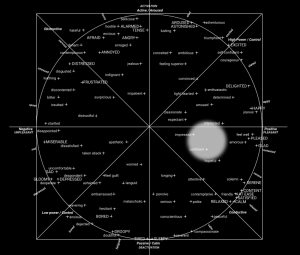
For example, you can plot detected emotions on a 2D space using the emotional spectrum model:
- What confidence properties are exposed by the SDK?
The SDK exposes different types of signals that can be used to assess the reliability of a measurement, but they should not all be interpreted as the same kind of "confidence".
The most important distinction is between:
- Face detection confidence
- Input / face quality indicators
- Model score distributions
- Derived reliability indicators, which can be computed at application level
1. Face detection confidence
The FACE_DETECTOR module exposes a confidence property inside each detected face bounding box:
face_detector.rects[0].confidence
This value should be interpreted as a face detection / localization confidence. It is useful to understand whether the SDK has detected a face with enough reliability and whether the resulting face crop is likely usable for downstream analysis.
However, this value should not be interpreted as the confidence of the emotional, affective, attention, or engagement analysis:
High face detector confidence ≠ high emotion confidence
It means the face was detected/localized reliably. It does not mean that the emotional interpretation itself is necessarily reliable.
Recommended use:
- Filter out weak or uncertain face detections
- Avoid processing frames where the detected face crop is not reliable
- Combine it with other quality checks before using downstream metrics
2. Face quality indicators
The SDK also provides face quality information through FACE_QUALITY. For example:
face_quality.isDark
face_quality.darkness
These values are not affective-model confidence scores. They are input quality indicators that help answer the question: Was the visual input good enough to trust the downstream analysis?
If the face crop is too dark, affected by strong backlight, or otherwise visually degraded, the SDK output should be ignored or treated with caution, regardless of the emotion or attention value returned.
Recommended use:
- Exclude frames/windows with poor input quality
- Classify aggregation windows as valid, cautionary, or not usable
- Prevent environmental conditions from being misinterpreted as user state
3. Model score distributions
Some modules expose a distribution of output scores. For example, FACE_EMOTION / FACE_EMOTION_HD expose a distribution across emotion classes:
emotion: {
  Angry: Number,
  Disgust: Number,
  Fear: Number,
  Happy: Number,
  Neutral: Number,
  Sad: Number,
  Surprise: Number
}
Similarly, other classification modules may expose score distributions or a mostConfident output when the top prediction exceeds a configured threshold.
These values can be used as classification strength indicators. If the top emotion score is much higher than the others, the model is expressing a stronger preference for that class. If the scores are more evenly distributed, the output is more ambiguous.
However, this is not the same as a calibrated, end-to-end confidence value. A high class score means the model output is concentrated on that class; it does not guarantee that the prediction is objectively correct in every real-world condition.
Recommended use:
- Use the distribution to detect ambiguous outputs
- Apply thresholds when a strong class assignment is required
- Prefer aggregated values over isolated frame-level values
- Avoid treating a class probability as a universal reliability score
A practical example:
Happy: 0.82, Neutral: 0.08, Sad: 0.04, ...
This is a strong model preference for Happy.
Happy: 0.34, Neutral: 0.29, Sad: 0.21, ...
This should be considered more ambiguous and interpreted with more caution.
4. Derived reliability indicators
For production use cases, especially when using 1–2 second aggregation windows, reliability can also be estimated by looking at the stability of the signal over time.
A stable window may indicate a more reliable reading:
attention: 0.72, 0.74, 0.71, 0.73
A highly variable window may indicate a less stable measurement:
attention: 0.20, 0.85, 0.31, 0.78
This kind of temporal stability indicator is a derived reliability metric based on variance, consistency, and number of valid samples within the aggregation interval.
Note: emotional signals can naturally change over time, especially when detecting short emotional peaks, so high variance is not always a sign of low quality — it may represent a real transient event.
Recommended use:
- Use temporal stability to support session-level scoring
- Combine it with quality checks and sample counts
- Avoid using it blindly to suppress genuine emotional peaks
- Tune it according to whether the product needs stable engagement scoring or short-event detection
Practical recommendation
For production decisioning, we recommend not relying on a single "confidence" value. Instead, use a layered reliability approach:
- Face detection confidence — Was the face detected and cropped reliably?
- Face quality indicators — Was the face crop visually usable?
- Prediction rate / sample count — Were enough valid predictions collected in the aggregation window?
- Model score distribution — Is the model output concentrated or ambiguous?
- Temporal stability — Is the signal stable enough for the specific decision being made?
For use cases where data is aggregated every 1–2 seconds, the most robust approach is to use these indicators together at the aggregation-window level rather than making decisions from isolated frame-level outputs.
- How does the smoothing algorithm work?
Several SDK modules apply temporal smoothing to reduce frame-to-frame noise and make the output more stable over time.
At a high level, smoothing behaves like an adaptive moving average applied to the module output.
The smoothness parameter controls the tradeoff between responsiveness and stability:
- lower values produce a faster response and make the output more sensitive to rapid changes;
- higher values produce a more stable output but with a slower response.
The following table provides approximate practical reference values:
| Approx. signal memory | Approx. smoothness value |
|---|---|
| 100 ms | 0.50 |
| 200 ms | 0.71 |
| 300 ms | 0.79 |
| 400 ms | 0.84 |
| 500 ms | 0.87 |
| ~650 ms | 0.90 |
| 1.0 s | 0.93 |
| 2.0 s | 0.97 |
Setting smoothness to 0 disables temporal smoothing and returns a raw signal. This can be useful for diagnostics, fixed-image analysis, or controlled testing, but it is usually not recommended for production decisioning because frame-level outputs can be noisier.
For FACE_ATTENTION, the SDK also supports separate riseSmoothness and fallSmoothness parameters. These allow the attention signal to react differently when the value is increasing versus when it is decreasing.
This is useful when the desired behavior is asymmetric, for example:
- allowing attention to recover quickly when the user returns to an attentive state;
- allowing attention to decrease more gradually when there is only a short temporary drop.
Smoothing should be configured according to the intended use case. Real-time reactions usually require lower smoothing, while session-level scoring or trend analysis usually benefits from more stable values.
For details on how module-level smoothing interacts with DATA_AGGREGATOR windowing, see How does module-level smoothing interact with DATA_AGGREGATOR?.
- How does module-level smoothing interact with DATA_AGGREGATOR?
There are two separate filtering layers that apply in sequence when DATA_AGGREGATOR is used.
Layer 1 — Module-level smoothing: applied frame-by-frame as values are produced by modules such as FACE_AROUSAL_VALENCE, FACE_EMOTION, or FACE_ATTENTION. This layer controls how quickly the per-frame output reacts to changes. The higher the smoothness value, the longer the history that influences the current output. See How does the smoothing algorithm work? for background and an approximate tuning table.
Layer 2 — DATA_AGGREGATOR windowing: summarizes the already-smoothed values over a wider time interval (default: periodMs: 1000, i.e. one second). Within each aggregation window:
avggives the mean of the smoothed values collected during the interval;minandmaxpreserve the observed range, which can help detect brief drops or peaks within the window;lastgives the most recent smoothed value at the end of the interval;samplesreports how many valid observations contributed to the aggregation.
The double-smoothing risk
If module-level smoothness is already high, the values arriving into DATA_AGGREGATOR are correlated and relatively stable. As a result:
minandmaxwithin the window will be close toavg, reducing their ability to highlight short-lived variation;- short-lived changes may already have been substantially attenuated by the module filter before reaching the aggregator.
To avoid excessive double-smoothing, consider the intended time scale of the measurement:
- if DATA_AGGREGATOR's
avgover a 1–2 second window is the primary output for scoring or reporting, keep module-levelsmoothnessmoderate (e.g. 0.40–0.70) so that genuine short-term variation is preserved across the aggregation window; - if module-level smoothing is already acting as the primary stability layer (e.g.
smoothness ≥ 0.90, equivalent to approximately 650 ms of signal memory), the aggregator'savgadds limited additional stabilization, andmin/maxbecome less informative.
A common effective setup for session-level scoring is to use moderate module-level smoothness (e.g. 0.50–0.70) to reduce per-frame noise, and to rely on DATA_AGGREGATOR's avg over a 1–2 second window for stable reporting. Use min/max within the aggregation window to detect short peaks or drops that may be meaningful for the specific use case.
- In which conditions can face analysis become less reliable?
MorphCast works best when the face is clearly visible, well lit, centered, and captured with sufficient image quality. Like any camera-based face-analysis system, reliability can decrease when the visual input is degraded, the face is partially hidden, or the face is difficult to interpret.
The main conditions that can reduce reliability are:
- Lighting issues: strong backlight, excessively strong frontal light, low light, overexposure, or strong shadows covering part of the face. The
FACE_QUALITYmodule can detect dark frames via theisDarkanddarknessoutput properties, which can be used to exclude affected frames from downstream interpretation. - Poor image quality: motion blur, low-resolution camera feed, compression artifacts, unstable focus, dirty camera lens, or low-quality video input.
- Face size and distance issues: face too small, too far from the camera, too close to be fully visible, or outside the recommended detection range of approximately 30 cm to 1 meter from the camera.
- Face orientation issues: strong yaw, pitch, or roll, especially when the face is not oriented toward the camera.
- Partial occlusions: hands, hair, hats, hoods, masks, objects, or other elements covering relevant facial regions. Some of these conditions can be detected using
FACE_FEATURESattributes such asEyeglasses,Hat,Bangs,Mustache,Goatee,Sideburns, andHeavy Makeup. Note: these attributes require settingshowAll: truein the module configuration. - Multiple faces: more than one visible face in the foreground when the expected setup is one primary user.
- Wide-angle distortion: face near the edge of a wide-angle frame, where geometric distortion can be stronger. See How should wide-angle cameras and camera image-correction features be handled?.
- Camera or OS-level processing: gaze correction, auto-reframing, beautification filters, virtual backgrounds, or image-enhancement features that alter the face crop.
- Appearance factors: glasses with strong reflections or very thick frames, heavy facial hair, hats, hoods, or makeup that significantly changes or covers expression-relevant facial regions.
- Continuous speaking or exaggerated mouth movement: this can make some emotion-related measurements less stable, especially when mouth movement is driven by speech rather than affective expression. This condition can be detected using the
Mouth Slightly Openattribute ofFACE_FEATURES(withshowAll: true). - Low prediction rate: device load, battery saver, browser throttling, lack of hardware acceleration, or too many active modules can reduce the number of valid predictions per second. See How can I monitor the prediction rate at runtime?.
The impact can vary by module. For example, attention is more sensitive to face orientation and framing, while emotion-related measurements can be more sensitive to lighting, occlusions, blur, facial hair, glasses, and continuous speaking.
Face detection localization reliability can be assessed via the confidence property inside each rects element returned by FACE_DETECTOR. For a broader overview of quality signals and confidence properties, see What confidence properties are exposed by the SDK?.
The goal is to avoid interpreting poor acquisition conditions as meaningful user state.
- What are the recommendations for optimizing reliability?
Before tuning the SDK configuration, make sure the session setup does not fall into the weak conditions described in In which conditions can face analysis become less reliable?.
The most important recommendations are listed below.
1. Use the recommended camera distance
The SDK can detect faces approximately from 30 cm to 1 meter from the camera.
For best reliability, we recommend a closer framing of approximately 30–60 cm, where the face is clearly visible and large enough in the frame without being cropped.
2. Keep the face clearly visible
The face should be fully visible and oriented toward the camera.
Avoid hands, hair, hats, hoods, masks, or objects covering the eyes, mouth, or other relevant facial regions. Also avoid multiple faces in the foreground when the expected setup is one primary user.
Some occlusion and appearance factors can be detected at runtime using FACE_FEATURES attributes such as Eyeglasses, Hat, Bangs, Mustache, Goatee, Sideburns, Heavy Makeup, and Mouth Slightly Open. Note: these attributes require setting showAll: true in the module configuration.
3. Use adequate and stable lighting
Avoid strong light sources directly in front of or behind the user.
Prefer even illumination, with no strong shadows covering the face. As indicative reference values:
- 300–500 lux is generally suitable for indoor environments;
- 750–1,000 lux can be appropriate for outdoor or very bright environments, provided the face is not overexposed.
The important point is not only the absolute light level, but that the face is evenly visible and not affected by backlight, harsh shadows, or overexposure.
4. Use a stable and simple background
Avoid strong backlight, moving backgrounds, virtual backgrounds, aggressive filters, or scene effects that may alter the face crop.
For best reliability, use a stable scene with the face centered and clearly separated from the background.
5. Use a clean, focused, sufficiently high-quality camera stream
Ensure that the camera lens is clean, properly focused, and physically capable of capturing clear facial details.
A camera stream with HD resolution or higher is recommended. Also verify the actual stream resolution provided by the browser and camera drivers, since it may be lower than the camera's nominal specification.
The SDK applies its own input-size cap before processing, so both the physical camera quality and the SDK input configuration matter.
6. Keep the camera stable
Keep the camera stable, preferably fixed or mounted, to reduce motion blur and sudden framing changes.
This is especially important for longer sessions, where small changes in angle, distance, or focus can affect consistency over time.
7. Enable WebGL hardware acceleration
For real-time use cases, WebGL hardware acceleration should be enabled and functioning.
This improves prediction rate and gives smoothing or aggregation logic more valid samples over the same time interval. For more details, see Does WebGL hardware acceleration improve accuracy or only performance?.
8. Increase the input resolution cap for face detection
For higher-quality face detection before downstream analysis, we recommend setting maxInputFrameSize to 640 when performance allows it.
The default value is lower, but increasing it to 640 preserves more input detail before the face detection stage.
Example configuration:
const MAX_INPUT = 640;

CY.loader()
  .licenseKey("_YOUR_LICENSE_KEY_")
  .maxInputFrameSize(MAX_INPUT)
  .addModule(CY.modules().FACE_DETECTOR.name)
  .addModule(CY.modules().FACE_EMOTION_HD.name)
  .load()
  .then(({ start }) => start())
  .catch(console.error);
Optionally, the same value can also be explicitly aligned on the FACE_DETECTOR module:
const MAX_INPUT = 640;

CY.loader()
  .licenseKey("_YOUR_LICENSE_KEY_")
  .maxInputFrameSize(MAX_INPUT)
  .addModule(CY.modules().FACE_DETECTOR.name, {
    maxInputFrameSize: MAX_INPUT
  })
  .addModule(CY.modules().FACE_EMOTION_HD.name)
  .load()
  .then(({ start }) => start())
  .catch(console.error);
Note: maxInputFrameSize applies to the input sizing and face detection stage. It does not change the fixed internal resolution used by the subsequent neural-network analysis modules.
9. Use FACE_EMOTION_HD when emotion-analysis quality is a priority
When emotion-analysis quality is more important than maximizing prediction rate, use FACE_EMOTION_HD instead of the standard FACE_EMOTION module.
FACE_EMOTION_HD is computationally heavier, so it should be validated on the actual target devices and browsers, and used together with adequate runtime performance monitoring, especially when several modules are active at the same time.
10. Use FACE_QUALITY as an additional gating signal
We recommend enabling FACE_QUALITY to detect low-quality visual input before it affects downstream interpretation.
If the face crop is too dark, the corresponding frame or aggregation window should be discarded or down-weighted. Low-quality input limits the quality of the downstream analysis regardless of the model output.
Example usage pattern:
window.addEventListener(CY.modules().EVENT_BARRIER.eventName, (evt) => {
  const quality = evt.detail.face_quality;

  if (quality?.isDark) {
    // Ignore or down-weight this frame/window before using downstream outputs.
    return;
  }

  // Continue with downstream analysis.
});
11. Monitor runtime quality signals
For production use, monitor the runtime conditions that affect reliability, including:
- face presence;
- face size;
- face pose;
- face quality (
FACE_QUALITY); - prediction rate (see How can I monitor the prediction rate at runtime?);
- number of valid samples in the aggregation window.
These signals help decide whether a frame or aggregation window should be used normally, down-weighted, or excluded from scoring. For a full overview of the available quality and confidence signals, see What confidence properties are exposed by the SDK?.
- What should I do if the face or frame is too dark?
Darkness can manifest in two distinct forms that require different handling.
The face is detected but too dark for reliable analysis
When the face detector successfully finds a face but the lighting is poor, the FACE_QUALITY module reports this via the isDark and darkness output properties. In this case, the recommended strategy is to dynamically switch the application UI to a white background, or display a bright white area near the user. This approach can significantly improve face illumination using the screen itself as a light source, and has been shown to be highly effective in practice.
Example: reading the darkness signal and switching the UI background:
window.addEventListener(CY.modules().FACE_QUALITY.eventName, (evt) => {
  const { isDark, darkness } = evt.detail.output;
  document.body.style.backgroundColor = isDark ? '#ffffff' : '';
});
You can also use the darkness value directly to apply a more gradual response, or to show a user-facing message asking them to improve their lighting.
For additional gating of downstream analysis when the face is too dark, see recommendation 10 in What are the recommendations for optimizing reliability?.
The frame is so dark that no face is detected
FACE_QUALITY analyzes the quality of the detected face crop. If the environment is so dark that the face detector cannot locate a face at all, FACE_QUALITY will not emit events for that frame.
In this scenario, face_detector.totalFaces will gradually tend toward zero as the temporal smoothing window progresses (the rate depends on the smoothness parameter). For an immediate per-frame check, set smoothness: 0 on FACE_DETECTOR — with smoothness: 0, totalFaces reflects the current frame only. Alternatively, inspect rects.length after filtering for rects[i].confidence > threshold, since the raw rects array may include low-confidence detections. Note that neither approach distinguishes between a completely dark frame and other no-face conditions (e.g., the user left the camera).
In both cases, applying a bright white background or prompting the user to improve their lighting remains a practical and effective first measure.
- How can I integrate the SDK with Zoom?
You can follow the official documentation. Here the main steps:
To join a meeting from web
- Import Zoom Web SDK
- Create a JWT Application in Zoom Marketplace. This will give you an API Key and a secret that will be used in the WEB SDK. You can import their example project and run it locally.
After you complete all these steps, you should be able to join any meeting created previously.
To create a meeting
- Authenticate with your zoom account
- Get the access TOKEN
- Create a meeting using the ZOOM APIs.
In order for zoom login to work you also need to create an OAuth App in Zoom Marketplace. After you get the authentication TOKEN, you will be able to use this method to create a meeting.
- How can I use the SDK in video-conferences?
Block diagram of an example for e-Learning

We encourage to analyze each face of each participant by his/her camera stream, sending the detected data to the other participants or to one or more specific participants using your conference communication channel. This solution is more scalable, you will have more accuracy in analysis independently of the network bandwidth and even if the participant disables the video communication.
Here, an example about how to integrate the SDK with Twilio service, for creating a video-call platform with emotion recognition, according to the circumplex model of affect.
Troubleshooting
Possible issues/error messages
- "You cannot load this SDK from an HTML page in your local file system. Please, serve this web page using a cloud or local web server."
- "Incorrect source path. SDK script is downloaded from a third-party server or proxy. Unpredictable behaviour can occur."
- "SecurityError: Failed to execute 'getImageData' on 'CanvasRenderingContext2D': The canvas has been tainted by cross-origin data."
- KNOWN DEVICE ISSUES
Solutions
"You cannot load this SDK from an HTML page in your local file system. Please, serve this web page using a cloud or local web server."
For security reasons, it is generally not recommended to open an HTML page in the local file system directly via browser. In fact, browsers become more and more stringent in making web applications work in that way, and some features are not available (e.g. root relative links, ajax and cors, cookies and local storage, service workers, etc.). So we cannot grant that MorphCast SDK will work correctly now or in the future, when loaded by a page with a "file://" URI scheme.
To work around these limitations we suggest two alternative ways:
- put the page on a cloud web server;
- or, serve HTML pages using a local web server.
"Incorrect source path. SDK script is downloaded from a third-party server or proxy. Unpredictable behaviour can occur."
The SDK must always be downloaded from the url indicated in the getting started snippet.
It is not allowed to autonomously distribute the SDK from servers not authorized by us even through a proxy server. Refer to the "Use of the Service" section of our Terms of Use.
"SecurityError: Failed to execute 'getImageData' on 'CanvasRenderingContext2D': The canvas has been tainted by cross-origin data."
See this related answer.
- iOS from version 15.0 to version 15.3 (included) does not work, unless experimental features "GPU Process" are turned off.
- iOS up to version iOS 14.2 does not support video input devices in UIWebView or WKWebView (e.g. in Chrome for iOS), but only directly in Safari.
- iOS up to version iOS 11.3 doesn't support the needed Wasm features.
- iOS up to version iOS 11 doesn't support GetUserMedia.
- Microsoft Edge up to version 16 doesn't support Wasm.
- Microsoft Internet Explorer is not supported.
- Opera mini is not supported.
Requirements
Minimum Requirements:
- Wasm Support
- Javascript Enabled Browser
-
Updated Browser and OS:
- Edge 16+ for Windows 10+
- Chrome 67+ for Android 5+, or Windows 7+, macOS 10.10+, iOS 14.3+ or iOS 15.4+, Linux Ubuntu 14.04+, Debian 8+, openSUSE 13.3+, or Fedora Linux 24+
- Safari 11.3+ for iOS 11.3+, or macOS 10.12+
- Firefox 63+ for Windows 7+, macOS 10.9+, Linux (GTK+ 3.4, GLib 2.22, Pango 1.22, X.Org 1.0, libstdc++ 4.6.1)
- Recent hardware (2019 onwards)
CAMERA:
- Mandatory: GetUserMedia Support
FACE_DETECTOR:
- Recommended: Wasm
- Mandatory: WebWorkers Support
OTHER MODULES:
- Recommended: WebGL or Wasm
- Mandatory for Wasm: WebWorkers Support
Recommended hardware for real-time use:
For best performance, WebGL hardware acceleration should be enabled in the browser.
The SDK can run on a range of devices, but real-time use cases require sufficient GPU acceleration to maintain an adequate prediction rate.
As a practical minimum baseline, we recommend hardware comparable to Intel® UHD Graphics or better. Devices below this level may still run the SDK, but prediction rate and responsiveness may be too low for reliable real-time decisioning, especially when multiple modules are active.
For production deployments, the effective prediction rate should always be validated on the actual target devices, browsers, operating systems, and SDK configurations used by end users. See also Does WebGL hardware acceleration improve accuracy or only performance? and What are the recommendations for optimizing reliability?.
Change Log
Migrating from v1.14 to v1.15
-
In FACE_AROUSAL_VALENCE module, the output has some breaking changes. Attributes calibrated , arousalvalence and rawArousalvalence of event.detail have been removed as deprecated. You can re-map them in the following way:
v1.14 v1.15 output.calibrated.arousal -> output.arousal output.calibrated.valence -> output.valence output.arousalvalence.arousal -> output.arousal output.arousalvalence.valence -> output.valence output.rawArousalvalence.arousal -> output.arousal (with smoothness parameter at 0) output.rawArousalvalence.valence -> output.valence (with smoothness parameter at 0) -
In FACE_GENDER module, in case of poor confidence output.gender now returns a probability distribution with undefined values, i.e.
gender: {Male: undefined, Female:undefined}, as output.mostConfident already did. -
In all modules, output with prefix "raw" have been removed as deprecated. You can set smoothness to 0 and use the primary output.
SDK Versions
1.17.3
- General improvements to processing quality across SDK modules
- Improved WebGL processing reliability
- Bugfixes and documentation updates
1.17.2
- Updated endpoints and licensing
1.17.1
- Improved FACE_EMOTION_HD compatibility with FACE_EMOTION
- Improved FACE_EMOTION_HD integration with face quality checks
- Improved FACE_DETECTOR detection reliability
- Bugfixes
1.17.0
- Updated FACE_AROUSAL_VALENCE module
- Updated FACE_EMOTION module
- Added FACE_QUALITY module
- Added FACE_EMOTION_HD module
1.16.6
- Updated FACE_FEATURES module
- Added automatic stop of the SDK after 3 hours of usage
1.16.5
- Updated all modules, numerical values in output are rounded to 2 decimals
- Added POSITIVITY module
1.16.4
- Improved support of in-browser webviews of iOS and Android Apps (e.g. Facebook / Instagram / Linkedin)
1.16.3
- Updated DATA_AGGREGATOR module, output values rounded to 2 decimals
1.16.2
- Updated DATA_AGGREGATOR module, improved precision of scheduler
1.16.0
- Updated endpoints
- Bugfixes and security updates
1.15.7
- Bugfixes
1.15.4
- Added ALARM_GENERIC module
1.15.2
- Added DATA_AGGREGATOR module
1.15.1
- Fixed bug in "raw" signal mode for picture analysis
1.15.0
- Added ALARM modules (ALARM_LOW_ATTENTION, ALARM_MORE_FACES, ALARM_NO_FACE)
- Added EVENT_BARRIER and CAMERA output
- Added separate arousal and valence output in FACE_AROUSAL_VALENCE module (arousalvalence and calibrated are deprecated)
- Updated FACE_DETECTOR module, multiface config is now true by default (i.e. face tracker is always disabled)
- Updated gender output in FACE_GENDER module
- Removed "raw" output from all modules
- License key is now required
- Bugfixes and security updates
1.14.14
- Fixed Wasm support for Safari 14+ (iOS and Mac OS)
1.14.10
- Minor bugfixes
1.14.9
- Added Affects output to FACE_AROUSAL_VALENCE module
1.14.8
- Added check of correct input source
- Updated endpoints
- Added error message in case of incorrect source path of SDK
1.14.7
- Added some warnings
1.14.6
- Updated totalFaces output in FACE_DETECTOR event
1.14.5
- Security updates
- Minor bugfixes
1.14.4
- Updated endpoints
1.14.3
- Added parameter for enabling multi-face in FACE_DETECTOR module
- Added totalFaces output in FACE_DETECTOR event
1.14.2
- Added rise and fall smoothness parameters for FACE_ATTENTION module
1.14.1
- Added createSource facility for creating a custom source from Camera, VideoElement or URL
1.14.0
- Updated architecture to dynamically adapt the rate of analysis to available computing resources
- Added powerSave configuration parameter
Code interface
MorphCast SDK defines this global object: CY
Example:
CY.loader()
This object contains all the methods and classes listed below.
loader
Creates the SDK instance
Note: creating multiple instances of the SDK is not supported.
AiSdkBuilder:
object for managing the configuration and loading of the SDK instance
CY.loader()
  .addModule(CY.modules().FACE_DETECTOR.name)
  .load()
  .then(({ start, stop, terminate }) => start());
modules
Returns all the AI-SDK module objects, each one with the following structure: { name: 'moduleName', event: 'eventName', specificEventA:'aSpecificEventOfTheModule'}
{CAMERA, FACE_DETECTOR, FACE_BASE, FACE_AGE, FACE_EMOTION, FACE_FEATURES, FACE_GENDER, FACE_POSE, SMART, FRUIT, etc..}:
CY.loader().addModule(CY.modules().MODULE.name);

 // ...

window.addEventListener(CY.modules().MODULE.eventName, (evt) => {
 console.log('Result', evt.detail);
});
createSource
Factory tool to create a custom source object for MorphCast SDK.
const cameraSource = CY.createSource.fromCamera({constraints, video});
const customSource = CY.createSource.fromVideoElement(document.getElementById("videoId"));
const customSource = CY.createSource.fromVideoUrl("https://localhost/test.mp4");
Camera factory method to get a source, able to grab images from device camera. Internally, it uses getUserMedia.
(Object
            = {})
custom configurations
| Name | Description |
|---|---|
config.constraints Object
(default {audio:false,video:true})
|
getUserMedia constraints |
config.video HTMLVideoElement
(default document.createElement('video'))
|
video tag that will receive getUserMedia stream as srcObject |
config.flip Number
(default 0)
|
Flips the acquired frame clockwise 90 degrees * flip value.
|
Camera:
source object for MorphCast SDK
const cameraSource = CY.createSource.fromCamera({
  constraints: {
    audio: false,
    video: true
  },
  video: document.createElement('video'),
  flip: 0
});

CY.loader()

  .source(cameraSource)
  // etc...
Factory method to get a source, able to grab frames from the specified HTMLVideoElement object.
(any)
HTMLVideoElement object
Object:
source object for MorphCast SDK
const customSource = CY.createSource.fromVideoElement(document.getElementById("videoId"));

CY.loader()
  .source(customSource)
  // etc...
Factory method to get a source, able to grab frames from the video media resource specified in the URL. A video element is created and managed internally.
(any)
String containing the URL for the video resource
Object:
source object for MorphCast SDK
const customSource = CY.createSource.fromVideoUrl("https://localhost/test.mp4");

CY.loader()
  .source(customSource)
  // etc...
AiSdkBuilder
Object returned by the "CY.loader()" method. It is used to configure and load the SDK instance.
CY.loader()
  .licenseKey("insert-here-your-license-key")
  .addModule(CY.modules().FACE_DETECTOR.name)
  .source(CY.getUserMediaCameraFactory().createCamera()) // Optional
  .maxInputFrameSize(320) // Optional - Default 320px
  .powerSave(1) // Optional - Default 0.4
  .autoStopTimeout(3*3600*1000) // Optional - Default 3 hours
  .loadErrorHandler((err)=>console.error(err)) // Optional
  .runErrorHandler((err)=>console.warn(err)) // Optional
  .load() // Mandatory
  .then(({ start }) => start());

  window.addEventListener(CY.modules().FACE_DETECTOR.eventName, (evt) => {
   console.log(CY.modules().FACE_DETECTOR.eventName, evt.detail);
  });
Optional. Default: load all licensed modules
Adds a module that will be loaded
(any)
(Object
            = {})
[{}]
Module configuration
AiSdkBuilder:
Sets the power save percentage for frame processing cycles, from 0 (0%) to 1 (100%). The rate of analysis per second will dynamically adapt to available computing resources. A higher power save factor means a lower CPU and GPU usage.
(number
            = 0.4)
factor
AiSdkBuilder:
Sets a custom source that will be used to provide the SDK modules with images. If no custom source is specified, the internal source of the SDK will be used by default. The internal source only gets a 640x480 camera stream from the browser (or similar), in order to be compatible with most devices and browsers.
(Object)
Source of images to process
| Name | Description |
|---|---|
source.getFrame Function
|
getFrame(maxSize) should return the imageData to be processed resized to maxSize if defined. |
source.start Function
|
start() should start the acquisition process. Eg: call getUserMedia(...) |
source.stop Function
|
stop() should stop the acquisition process. |
source.stopped boolean
|
stopped should return true if the camera is currently stopped |
AiSdkBuilder:
Sets the down-scaling to perform to the input source, before passing frames to the SDK modules.
Normally, the internal source of the SDK gets a 640x480 camera stream from the browser, then frames are reduced to 320px by default. Aspect ratio is preserved.
The value set should be between 320 and 640, since up-scaling cannot be performed.
A higher value can be set only when using a custom source, as long as it does not exceed the size of the input.
(number
            = 320)
target resolution for the greater dimension, in pixels
AiSdkBuilder:
Set the duration for the auto-stop timeout feature in milli-seconds. This feature ensures that the SDK automatically stops after the specified duration of continuous usage without any pauses. By default, the timeout is set to 3 hours (10800000 milliseconds).
(number
            = 3*3600*1000)
The duration in milliseconds for the auto-stop timeout. After this duration, the SDK will be automatically stopped. The default value is 10800000 (3 hours).
Sets an handler for errors occurring while modules are loaded.
(Function
            = (err)=>console.error(err))
handler the load error handler
AiSdkBuilder:
Sets an handler for errors occurring while processing frames in modules
(Function
            = (err)=>console.warn(err))
handler the run error handler
AiSdkBuilder:
Sets and handler for module.process() rejected because the previous processing has not yet finished.
(Function
            = (err)=>undefined)
handler the busy message
AiSdkBuilder:
Load all the added modules
To start, stop or unload the SDK, you can invoke the "start", "stop" and "terminate" methods returned by the promise, see the example below.
Promise<{start, stop, terminate}>:
let stopSDK, terminateSDK;
  CY.loader()
    .licenseKey("insert-here-your-license-key")
    .addModule(CY.modules().FACE_DETECTOR.name)
    .load()
    .then(({ start, stop, terminate }) => {
         stopSDK = stop;
         terminateSDK = terminate;
         start();
         setTimeout(stopSDK, 10000); // SDK will be stopped after 10 seconds after loading
         setTimeout(terminateSDK, 20000); // SDK will be unloaded after 20 seconds
     });
_hasEffectiveFaceAnalysis
Returns true only when there is effective face analysis in the current tick:
- face_detector found at least one face, AND
- face_quality (if present in allData) did not signal skipProcessing Used to gate addImagesProcessed() so that usage is only counted for real analysis.
(Array)
boolean:
Camera
Camera that uses GetUserMedia.
Note: it cannot be initialized with
Stops the camera stream.